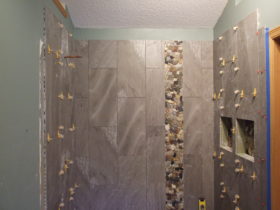
Shower wall tile installation

Tiled shower walls can have a profound impact in your bathroom. This project was a remodeling project complete with 2 inset shelves and a vertical accent. We started by demoing the existing walls down to the studs. Here is how it was done.
1. Install Durock or equivalent brand 1/2″ cement board using galvanized roofing nails or tile/deck screws every 8 inches. In all wet areas cement board should be installed to at least 5′ high or in all areas that come in direct contact with water. Tape all seams with fiberglass mesh tape and thinset mortar. We installed 2 inset or niche tile shelves in this shower using 2×4’s to frame, Durock for the sub-strate, and Laticrete Hydroban waterproofing to seal the shelf.
2. Determine layout or pattern. Start with one horizontal level line on the back wall and one perpendicular line. From there it is good to have a line every 3 courses of tile or so. Draw in deco patterns.
3. Use a 1/4″ to 1/2″ trowel to apply a non-sag thinset mortar to install the tile. On this project we also used leveling clips and spacers to allow for nice consistent grout joints and a smooth surface.
4. Grout after 24 hours of curing.
5. Use 100% silicon in all 90 degree corners.


